文件系统中跳转
pwd/ls/cd
# print working directory 打印当前工作目录
pwd
# list 列出目录内容
ls
# change directory 更改目录
cd

## 有用的快捷键
cd ## 切换到家目录
cd - ## 切换到之前的目录
cd ~username ## 切换到指定用户的家目录
探究操作系统
ls/file/less
## ls 的常用选项

-a ## 列出全部,包括隐藏文件
-l ## 以长格式显示
-h ## 以可读格式显示 --huaman-readable
-F ## 经典格式展示 --classify,如果名字是目录,会添加一个“/” 提示符
-S ## 按文件大小排序,默认按字母升序

#-----------------------------------------------------------------
[root@linux-command-line ~]# ls -alFhS
total 48K
-rw-------.  1 root root  12K May 20 08:55 .bash_history
-rw-------   1 root root 6.2K May 19 14:21 .viminfo
drwxr-xr-x   8 root root 4.0K Oct 29  2019 .nvm/
-rw-------.  1 root root 1.4K Sep 10  2019 anaconda-ks.cfg
-rw-r--r--.  1 root root  373 Oct 25  2019 .bashrc
dr-xr-xr-x. 18 root root  256 Oct 14  2019 ../
dr-xr-x---.  8 root root  228 May 19 14:21 ./
-rw-r--r--.  1 root root  176 Dec 29  2013 .bash_profile
drwxr-xr-x   5 root root  144 Oct 24  2019 .pm2/
-rw-r--r--.  1 root root  129 Dec 29  2013 .tcshrc
-rw-r--r--.  1 root root  100 Dec 29  2013 .cshrc
drwxr-xr-x   4 root root   70 Oct 29  2019 .npm/
drwx------   3 root root   25 Oct 12  2019 .config/
drwxr-xr-x   3 root root   22 Oct 29  2019 .cache/
drwxr-----   3 root root   19 Oct 12  2019 .pki/
-rw-r--r--.  1 root root   18 Dec 29  2013 .bash_logout

## 上述每一列的含义如下
drwxr-xr-x   5 root root  144 Oct 24  2019 .pm2/
- 第一个字符表示文件或目录 - 普通文件 d 目录
- 其后三个字符是文件所有者的访问权限,
- 再其后的三个字符是文件所属组中成员的访问权限,
- 最后三个字符是其他所有人的访问权限
- 5 表示硬链接的数目
- root 表示文件所有者的用户名
- root 表示文件所属用户组
- 144 文件大小,字节数
- Oct 24  2019 文件上次修改的日期
- .pm2/ 文件和目录的名称
#------------------------------------------------------------------------


## file 确定文件类型
[root@linux-command-line ~]# file .bash_profile
.bash_profile: ASCII text
[root@linux-command-line ~]# file .pm2/
.pm2/: directory


## less filename 从前向后查看文件,对于超过一页的文件,需要进行滚动或查找时,比 cat 方便
less /etc/passwd

- 可以使用上下箭头滚动
- g/G 移到开头或最后一行
- /charaters 查找关键字。 比如 /root
- q 退出less程序
符号链接
# 符合链接,即Symbolic Links, 也称软连接soft link 或 symlink
[root@linux-command-line lib]# ls libc.so.6 -al
lrwxrwxrwx 1 root root 12 Oct 10  2019 libc.so.6 -> libc-2.17.so

- 第一个字符l  # 即代表libc.so.6文件为符号链接文件
- libc.so.6 -> libc-2.17.so, # 代表libc.so.6 文件是一个符合链接,其真正指向的是 libc-2.17.so (2.27 版本)这个版本的共享库文件。当我们寻找或使用libc.so.6时,实际指向的是libc-2.17.so
硬链接
硬链接是通过索引节点进行的链接。
在Linux中,多个文件指向同一个索引节点是允许的,像这样的链接就是硬链接。
硬链接只能在同一文件系统中的文件之间进行链接,不能对目录进行创建。
:zap: 如果删除硬链接对应的源文件,则硬链接文件仍然存在,而且保存了原有的内容,这样可以起到防止因为误操作而错误删除文件的作用。
操作文件和目录
cp		 # 复制文件或文件夹,常用选项 -r -i
mv 		 # 执行文件移动和文件命名,完成操作或原来的文件不存在。
mkdir    # 创建目录 -p 递归创建
rm		 # 删除文件或目录
ln       # 创建链接
cp -复制文件或目录
:zap: 拷贝目录下的所有文件到另一个目录
[root@linux-command-line ~]# tree
.
├── html
└── test
    ├── 1.html
    ├── 2.html
    ├── README.md
    └── src
        └── index.html

# 将上述test目录下的所以文件或子目录拷贝到html目录

------------------- # 错误方法1
[root@linux-command-line ~]# cp test html
cp: omitting directory ‘test’
[root@linux-command-line ~]# tree
.
├── html
└── test
    ├── 1.html
    ├── 2.html
    ├── README.md
    └── src
        └── index.html

# 即cp不能直接拷贝目录
# 解决方案1: -r/-R选项,拷贝目录或子目录 -R, -r, --recursive  (copy directories recursively)

------------------- # 错误方法2
[root@linux-command-line ~]# cp -r test html  或 cp -r test/ html
[root@linux-command-line ~]# tree
.
├── html
│   └── test
│       ├── 1.html
│       ├── 2.html
│       ├── README.md
│       └── src
│           └── index.html
└── test
    ├── 1.html
    ├── 2.html
    ├── README.md
    └── src
        └── index.html

-- 发现直接给test目录拷贝进去了
:100: 正确方法:cp -r test/* html
# 先删除html目录下所有文件或目录
[root@linux-command-line ~]# rm -rf html/*

[root@linux-command-line ~]# cp -r test/* html
[root@linux-command-line ~]# tree
.
├── html
│   ├── 1.html
│   ├── 2.html
│   ├── README.md
│   └── src
│       └── index.html
└── test
    ├── 1.html
    ├── 2.html
    ├── README.md
    └── src
└── index.html上述方法的前提是html目录已经存在,如果不存在,可以直接拷贝:cp -r test html
[root@linux-command-line ~]# cp -r test html
[root@linux-command-line ~]# tree
.
├── html
│   ├── 1.html
│   ├── 2.html
│   ├── README.md
│   └── src
│       └── index.html
└── test
    ├── 1.html
    ├── 2.html
    ├── README.md
    └── src
        └── index.html

# 会自动创建html文件,并忽略test目录 
:warning:==慎用 cp file1 file2 , 因为file2 有可能会被重写。==
通配符
上述拷贝命令使用到了通配符
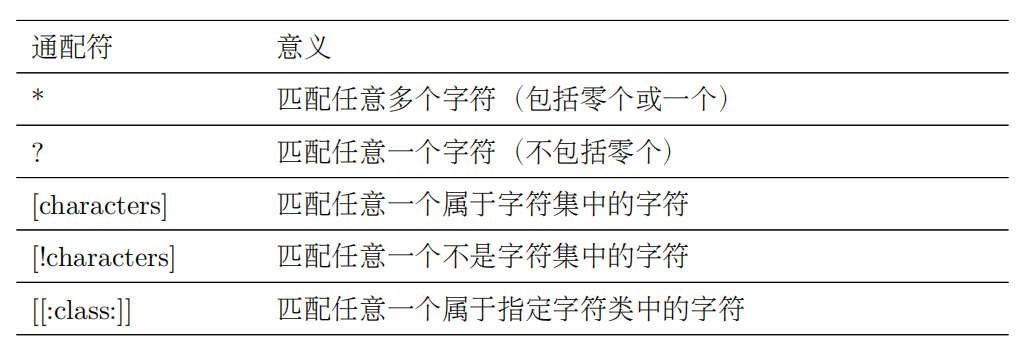
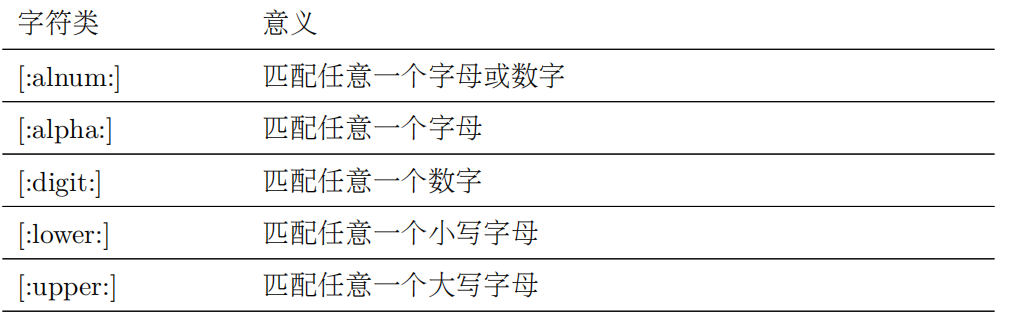
:zap:示例:
mv -重命名或移动
# mv 命令可以执行文件移动和文件命名任务,这依赖于你怎样使用它。任何一种情况下,完成操作之后,原来的文件名不再存在。

# 最佳实践是:
-- 如果重命名,确保目标文件或目录不存在
-- 如果是移动文件或目录,确保目标目录已经存在

# 示例1: 将old.txt 重命名为 new.txt
[root@linux-command-line ~]# tree .
.
└── old.txt

0 directories, 1 file
[root@linux-command-line ~]# mv old.txt new.txt
[root@linux-command-line ~]# tree
.
└── new.txt

# 示例2: 将new.txt 及 views 目录移动到src 目录
[root@linux-command-line ~]# tree .
.
├── new.txt
├── src
└── views
    └── index.html

2 directories, 2 files
[root@linux-command-line ~]# mv new.txt views src
[root@linux-command-line ~]# tree .
.
└── src
    ├── new.txt
    └── views
        └── index.html

2 directories, 2 files
rm - 删除文件和目录
rm 1.txt 		 # 默默的删除1.txt
rm -i 1.txt		 # 同上,删除文件时给出提示,是否需要删除进行确认
-- 在centos7.9 上测试, rm 1.txt 也会给出提示

# 测试删除文件
[root@linux-command-line ~]# ls
1.txt
[root@linux-command-line ~]# rm 1.txt
rm: remove regular file ‘1.txt’? y
[root@linux-command-line ~]# ls

# 测试删除文件及目录,以及目录下的所以内容
[root@linux-command-line ~]# tree .
.
└── src
    └── index.html

1 directory, 1 file
[root@linux-command-line ~]# rm -r src
rm: descend into directory ‘src’? y
rm: remove regular empty file ‘src/index.html’? y
# rm -r 会递归删除目录下的所有文件,直到目录为空,在删除空目录

# 如果不希望步步提示,可以使用 rm -rf src
[root@linux-command-line ~]# tree .
.
└── src
    └── index.html

1 directory, 1 file
[root@linux-command-line ~]# rm -rf src
[root@linux-command-line ~]# tree
.

0 directories, 0 files


# ------------------- 请谨慎使用 -f 或通配符删除 ------------------------
# 如果只想删除当前目录的 .html文件,但是不小心多了一个空格,如下,则会删除当前目录下的所有文件。 如:
rm * .html
ln - 创建链接
ln 命令既可创建硬链接,也可以创建符号链接。
ln file link    # 创建硬链接。file 只能是文件,不能是目录,必须在同同一磁盘
ln -s item link # 创建符号链接,也称软链接 -s ~~ soft,item为文件或目录
:zap: 硬链接和文件本身没有区别,删除原文件,不影响硬链接。
# 测试硬链接
[root@linux-command-line ~]# ls
hard.txt
[root@linux-command-line ~]# cat hard.txt
hello hard link
[root@linux-command-line ~]# ln hard.txt hard
[root@linux-command-line ~]# ls
hard  hard.txt
[root@linux-command-line ~]# cat hard
hello hard link
[root@linux-command-line ~]# rm -rf hard.txt
[root@linux-command-line ~]# ls
hard
[root@linux-command-line ~]# cat hard
hello hard link
:zap: 符号链接生效,是通过创建一个特殊类型的文件,这个文件包含一个关联文件或目录的文本指针, 和 Windows 的快捷方式差
不多。
一个符号链接指向一个文件,而且这个符号链接本身与其它的符号链接几乎没有区别。
如果你往一个符号链接里面写入东西,那么相关联的文件也被写入。
然而,当你删除一个符号链接时,只有这个链接被删除,而不是文件自身。
如果先于符号链接删除文件,这个链接仍然存在,但是不指向任何东西。在这种情况下,这个链接被称为坏链接。
# 测试符号链接
[root@linux-command-line ~]# cp /etc/passwd .
[root@linux-command-line ~]# ls
passwd
# 创建一个测试文件
[root@linux-command-line ~]# mv passwd fun
[root@linux-command-line ~]# ln -s fun fun-sym
# 查看符号链接
[root@linux-command-line ~]# ll -i
total 4
139075807 -rw-r--r-- 1 root root 960 May 28 13:26 fun
139298494 lrwxrwxrwx 1 root root   3 May 28 13:26 fun-sym -> fun
# 删除源文件
[root@linux-command-line ~]# rm -f fun
[root@linux-command-line ~]# ls
fun-sym
# 查看符号链接的内容,显示找不到源文件
[root@linux-command-line ~]# cat fun-sym
cat: fun-sym: No such file or directory
使用命令
type 	# 解释一个命令
which 	# 显示会执行哪个可执行程序
man     # 显示命令的手册,即详细帮助
apropos # 显示一系列适合的命令
info    # 显示命令的info
whatis  # 显示一个命令的简介描述
alias   # 创建命令的别名
测试代码
# type -显示命令的类型
[root@linux-command-line ~]# type type
type is a shell builtin
[root@linux-command-line ~]# type ls
ls is aliased to `ls --color=auto'
[root@linux-command-line ~]# type pwd
pwd is a shell builtin
[root@linux-command-line ~]# type cd
cd is a shell builtin


# which -显示一个可执行程序的位置
[root@linux-command-line ~]# which ls
alias ls='ls --color=auto'
	/usr/bin/ls
[root@linux-command-line ~]# which cd
/usr/bin/cd
[root@linux-command-line ~]# which node
/root/.nvm/versions/node/v12.13.0/bin/node


# help -得到 shell 内建命令的帮助文档
[root@linux-command-line ~]# help pwd
pwd: pwd [-LP]
    Print the name of the current working directory.

    Options:
      -L	print the value of $PWD if it names the current working
    	directory
      -P	print the physical directory, without any symbolic links

    By default, `pwd' behaves as if `-L' were specified.

    Exit Status:
    Returns 0 unless an invalid option is given or the current directory
    cannot be read.


# --help - 显示用法信息
[root@linux-command-line ~]# mkdir --help
Usage: mkdir [OPTION]... DIRECTORY...
Create the DIRECTORY(ies), if they do not already exist.

Mandatory arguments to long options are mandatory for short options too.
  -m, --mode=MODE   set file mode (as in chmod), not a=rwx - umask
  -p, --parents     no error if existing, make parent directories as needed
  -v, --verbose     print a message for each created directory
  -Z                   set SELinux security context of each created directory
                         to the default type
      --context[=CTX]  like -Z, or if CTX is specified then set the SELinux
                         or SMACK security context to CTX
      --help     display this help and exit
      --version  output version information and exit

GNU coreutils online help: <http://www.gnu.org/software/coreutils/>
For complete documentation, run: info coreutils 'mkdir invocation'


# man -显示程序手册页
-- 在大多数 Linux 系统中,man 使用 less 工具来显示参考手册,所以当浏览文档时,你所熟
悉的 less 命令都能有效。


# apropos -显示适当的命令
[root@linux-command-line ~]# apropos netstat
netstat (8)          - Print network connections, routing tables, interface statistics, masquerade connections, and multicast memberships


# whatis -显示非常简洁的命令说明
-- whatis 程序显示匹配特定关键字的手册页的名字和一行命令说明
[root@linux-command-line ~]# whatis ps
ps (1)               - report a snapshot of the current processes.
[root@linux-command-line ~]# whatis ls
ls (1)               - list directory contents
[root@linux-command-line ~]# whatis pwd
pwd (1)              - print name of current/working directory


#  info -显示程序 Info 条目
-- info 内容可通过 info 阅读器程序读取。info 页是超级链接形式的,和网页很相似。

#
别名 alias
linux 中 可以把多个命令放在同一行上,命令之间用 “;” 分开
[root@linux-command-line ~]# pwd;ls
/root
fun-sym
如果想为上述多个命令创建一个别名,例如 pwdls。可以先测试pwdls 是否是系统命令。
[root@linux-command-line ~]# type pwdls
-bash: type: pwdls: not found
# 创建别名
[root@linux-command-line ~]# alias pwdls='pwd;ls'
[root@linux-command-line ~]# which pwdls
alias pwdls='pwd;ls'
[root@linux-command-line ~]# pwdls
/root
fun-sym
如果要删除别名,使用unalias
[root@linux-command-line ~]# type pwdls
pwdls is aliased to `pwd;ls'
[root@linux-command-line ~]# unalias pwdls
[root@linux-command-line ~]# type pwdls
-bash: type: pwdls: not found
重定向
I/O 重定向是命令行最酷的特性。
“I/O” 代表输入/输出,通过这个工具,你可以将命令的输入来源以及输出地点重定向为文件。
也可以把多个命令连接起来组成一个强大的命令管道。
主要命令
# cat 	- 连接文件
# sort 	-排序文件
# uniq 	-报道或省略重复行
# grep 	-打印匹配行
# wc	-打印文件中换行符,字和字节个数
# head 	-输出文件第一部分
# tail 	-输出文件尾部
# tee	-从标准输入读取数据,并同时写到标准输出和文件
标准输入、输出和错误
在Linux中,许多程序都会产生某种输出。
通常,程序的运行结果会输送到一个叫作标准输出的文件(一切皆文件),用stdout表示。
而程序的运行状态信息则送到另一个叫作标准错误的文件,用stderr表示。
默认情况,stdout和stderr 都连接到屏幕,而不是保存到磁盘。
同时,许多程序从一个叫作**标准输入(stdin)**的设备得到输入,默认情况下,连接到键盘。
:zap:即一般情况,输出送到屏幕,输入来自键盘,但是,通过I/O重定向,我们可以做出改变。
标准输出重定向符号
# 我们使用 “>” 重定向符 后接文件名 将标准输出重定向到除屏幕以外的另一个文件。

# 例如,把 ls 命令的运行结果输送到文件ls-output.txt 中去,由文件代替屏幕。
ls -l /usr/bin > ls-output.txt
标准输出重定向符号追加符
:zap: 当我们使用>重定向标准输出结果时,目标文件总是从开头被重写。
# ------------测试-----------------------
# 向text.txt 中写入 hello world
~$ echo 'hello world' > text.txt
~$ cat text.txt
hello world
# 查看一个不存在的文件,标准输出为空(输出的是标准错误),重定向结果到 text.txt
~$ ls -l nofile.txt > text.txt
ls: cannot access 'nofile.txt': No such file or directory
# 查看text.txt, 文件被情况
~$ cat text.txt怎样才能把重定向结果追加到文件内容后面,而不是从开头重写文件?我们使用 “>>” 重定向符:
# ---------------- 测试 -----------------------
~$ echo 'hello world' > nofile.txt
~$ cat nofile.txt
hello world
~$ echo 'hello world' > text.txt
~$ cat text.txt
hello world
~$ cat nofile.txt >> text.txt
~$ cat text.txt
hello world
hello world
标准错误重定向符号
标准错误重定向没有专用的重定向操作符。为了重定向标准错误,我们必须参考其文件描述符。
Linux下的几个特殊的文件描述符:
-
0 是标准输入(stdin)
-
1 是标准输出(stdout)
-
2 是标准错误输出(stderr)
因此,我们可以使用 2> 重定向标准错误。
# 测试
# text.txt 文件不存在
~$ cat test.txt
cat: test.txt: No such file or directory
~$ cat test.txt 2> ls-error.txt
~$ cat ls-error.txt
cat: test.txt: No such file or directory
重定向标准输出和错误到同一个文件
ls -l /bin/usr > ls-output.txt 2>&1首先重定向标准输出到文件 ls-output.txt,然后重定向文件描述符 2(标准错误)到文件描述符 1(标准输出)使用表示法 2>&1。
注意重定向的顺序安排非常重要。标准错误的重定向必须总是出现在标准输出重定向之后。
处理不需要的输出
有时候“沉默是金”,我们不想要一个命令的输出结果,只想把它们扔掉。
系统通过重定向输出结果到一个叫做 “/dev/null” 的特殊文件,为我们提供了解决问题的方法。
这个文件是系统设备,叫做位存储桶,它可以接受输入,并且对输入不做任何处理。
ls -l /bin/usr 2> /dev/null标准输入重定向
cat
cat 	# 读取一个或多个文件,然后复制他们到标准输出

# 由于cat可以接受多个文件,所以可以用来把文件连接在一起
# eg: 下载了一个大型文件,被分割成多个部分,如果想把他们连接起来,可以
cat movie.mpeg.0* > movie.mpeg

# cat 如果不传参数,他会从标准输入(默认键盘)读取数据
# 测试: 输入cat 命令
itshizhan@DESKTOP-D6KKJ9B:~$ cat

# 发现命令一直会挂起,等待用户输入,输入 hello world,然后 输入 Ctrl-d(按住 Ctrl 键同时按下 “d”),来告诉 cat,在标准输入中,它已经到达文件末尾(EOF):

itshizhan@DESKTOP-D6KKJ9B:~$ cat
hello worldhello world

# 可以通过> 将标准输入重定向到一个文件,如 lazy_dog.txt
itshizhan@DESKTOP-D6KKJ9B:~$ cat > lazy_dog.txt
hello world
itshizhan@DESKTOP-D6KKJ9B:~$ cat lazy_dog.txt
hello world
使用<重定向操作符
使用“<”重定向操作符,我们把标准输入源从键盘改到文件 lazy_dog.tx。
itshizhan@DESKTOP-D6KKJ9B:~$ cat < lazy_dog.txt
hello world
#  使用“<”重定向操作符,和传递单个文件名作为参数的执行结果一样
管道线
命令从标准输入读取数据并输送到标准输出的能力被一个称为管道线的 shell 特性所利用。
:zap: 使用管道操作符 “|”(竖杠),一个命令的标准输出可以通过管道送至另一个命令的标准输入:
ls -l /usr/bin | less过滤器
过滤器接受输入,以某种方式改变它,然后输出它。
# 测试sort 过滤器
# 我们想把目录/bin 和/usr/bin 中的可执行程序都联合在一起,再把它们排序,然后浏览执行结果
ls /bin /usr/bin | sort | less
uniq - 报道或忽略重复行
uniq 命令经常和 sort 命令结合在一起使用。
uniq 从标准输入或单个文件名参数接受数据有序列表,默认情况下,从数据列表中删除任何重复行。
ls /bin /usr/bin | sort | uniq | less

# 如果我们想看到重复的数据列表,让 uniq 命令带上 “-d” 选项
ls /bin /usr/bin | sort | uniq -d | less
wc -打印行数、字数和字节数
# wc(字计数)命令是用来显示文件所包含的行数、字数和字节数
itshizhan@DESKTOP-D6KKJ9B:~$ wc lazy_dog.txt
1  2 14 lazy_dog.txt
# wc 打印出来三个数字:包含在文件 ls-output.txt 中的行数,单词数和字节数。
# -l 只输出行数

# 添加 wc 到管道线来统计数据,是个很便利的方法。查看我们的有序列表中程序个数,我们可以这样做:
itshizhan@DESKTOP-D6KKJ9B:~$  ls /bin /usr/bin | sort | uniq | wc -l
1005
grep -打印匹配行
grep 是个很强大的程序,用来找到文件中的匹配文本。这样使用 grep 命令:
# 当 grep 遇到一个文件中的匹配 “模式”,它会打印出包含这个类型的行。
# grep 能够匹配的模式,除了简单文本匹配外,还支持正则表达式
grep pattern [file...]

#  ------------------- 测试 ---------------------
# 找到文件名中包含单词 “zip” 的所有文件
itshizhan@DESKTOP-D6KKJ9B:~$ ls /bin /usr/bin | sort | uniq | grep zip
bunzip2
bzip2
bzip2recover
gpg-zip
gunzip
gzip
zipdetails
itshizhan@DESKTOP-D6KKJ9B:~$ ls /bin /usr/bin | sort | uniq | grep zip | wc -l
7
grep 选项:
- -i:使得 grep 在执行搜索时忽略大小写(通常,搜索是大小写敏感的)
- -v:选项会告诉 grep 只打印不匹配的行。
itshizhan@DESKTOP-D6KKJ9B:~$ ls /bin /usr/bin | sort | uniq | grep Zip2
itshizhan@DESKTOP-D6KKJ9B:~$ ls /bin /usr/bin | sort | uniq | grep Zip2 -i
bunzip2
bzip2
bzip2recover
head / tail-打印文件开头部分**/**结尾部分
# head 命令打印文件的前十行
# tail 命令打印文件的后十行。
# 默认情况下,两个命令都打印十行文本,“-n” 选项来调整命令打印的行数

itshizhan@DESKTOP-D6KKJ9B:~$ head -n 2 /etc/passwd
root:x:0:0:root:/root:/bin/bash
daemon:x:1:1:daemon:/usr/sbin:/usr/sbin/nologin
itshizhan@DESKTOP-D6KKJ9B:~$ tail -n 2 /etc/passwd
itshizhan:x:1000:1000:,,,:/home/itshizhan:/bin/bash
mysql:x:112:119:MySQL Server,,,:/nonexistent:/bin/false
:apple: tail 有一个选项-f允许你实时地浏览文件。当观察日志文件的进展时,这很有用
tee -从 Stdin 读取数据,并同时输出到 Stdout 和文件
tee 程序从标准输入读入数据,并且同时复制数据到标准输出**(允许数据继续随着管道线流动)**和一个或多个文件。
ls /usr/bin | tee ls.txt | grep zip
itshizhan@DESKTOP-D6KKJ9B:~$ cat ls.txt | wc -l
1002
# 在 grep 过滤管道线的内容之前,来捕捉整个目录列表到文件 ls.txt
从shell眼中看世界
echo
[root@hostname30 ~]# echo this is test
this is test
[root@hostname30 ~]# echo $((2+2))
4
# shell 在展开中执行算数表达式。这允许我们把 shell 提示当作计算器来使用
# 算术表达式展开使用这种格式:
- $((expression))
算术表达式只支持整数(全部是数字,不带小数点),但是能执行很多不同的操作。这里是
一些它支持的操作符:加+ 减 - 乘 * 除/ 取余 % 取幂 ** 。
在算术表达式中空格并不重要,并且表达式可以嵌套:
[root@hostname30 ~]#  echo $(($((5**2)) * 3))
75
花括号展开
通过花括号展开你可以从一个包含花括号的模式中创建多个文本字符串。
[root@hostname30 ~]# echo Front-{A,B,C}-Back
Front-A-Back Front-B-Back Front-C-Back
花括号展开模式可能包含一个开头部分叫做报头,一个结尾部分叫做附言。
花括号表达式本身可能包含一个由逗号分开的字符串列表,或者一个整数区间,或者单个的字符的区间。这种模式不能嵌入空白字符。
[root@hostname30 ~]# echo Number_{1..5}
Number_1 Number_2 Number_3 Number_4 Number_5

[root@hostname30 ~]#  echo {Z..A}
Z Y X W V U T S R Q P O N M L K J I H G F E D C B A

[root@hostname30 ~]#  echo a{A{1,2},B{3,4}}
aA1 aA2 aB3 aB4
:zap: 实战: 创建一系列以数值 “年-月” 形式命名的目录
[root@hostname30 ~]# mkdir Pics&&cd Pics
[root@hostname30 Pics]# pwd
/root/Pics
[root@hostname30 Pics]# mkdir {2007..2009}-0{1..9} {2007..2009}-{10..12}
[root@hostname30 Pics]# ls
2007-01  2007-04  2007-07  2007-10  2008-01  2008-04  2008-07  2008-10  2009-01  2009-04  2009-07  2009-10
2007-02  2007-05  2007-08  2007-11  2008-02  2008-05  2008-08  2008-11  2009-02  2009-05  2009-08  2009-11
2007-03  2007-06  2007-09  2007-12  2008-03  2008-06  2008-09  2008-12  2009-03  2009-06  2009-09  2009-12